Feeds:
Posts
Comments

Archive for the ‘Recipes’ Category

I’m on vacation.

Yup, that’s right. For the next two glorious weeks, I am practicing dolce far niente on the west coast, including a few lovely days in Vancouver with my parents, and a little roadtrip down the Oregon & California coasts with my amigo B.

Before leaving, it occured to me that I didn’t factor vacations in to 52 Projects. Given that I’m already behind (with 12 projects to finish in the next 7 weeks if I’m to keep strictly to timelines – an unlikely prospect), I began brainstorming what I could take on the road.

As I scanned the list of remaining project ideas, one immediately popped out – make a recipe by your great-grandmother! What better project to take on under the supervision of my own mom – cook and DIY-er extraordinaire!

An incredible piece of family history.

My mom, naturally, was totally on board with the idea. Her side of the family includes some

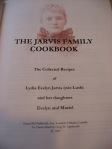
incredible family historians, providing easy access to such recipes. In fact, a few years back my Uncle Dave and Cousin Greg transcribed my great-grandmother’s recipes and self-published them as a gigantic recipe / history book.

I’ve spent a good chunk of the last few days here in Vancouver pouring over this book, marveling in the culinary changes that have taken place since my great-granny, Lydia Lush, was working away in the kitchen. I’ve laughed disgustingly at the pages of “jellied” recipes – Jellied Sandwiches, Jellied Salads, even Jellied Campbell’s soup (the only ingredients are Campbell’s soup and a package of lemon jelly powder … yikes!). I’ve poured over the chapter on “Domestic Science”, taking careful notes on how to preserve cheese, solder metal at home, remove grease spots, and properly dish up a plum pudding.

But of most interest to me are the hints of community and history found scattered across the pages. In an age where I google any recipe I want, Lydia carefully wrote each one out by hand, including notes about neighbours, social events,

My great grandmother - Lydia Lush

and new products —  Mrs Harley’s Filling for Maple Tarts (Much Liked!), Mrs Edmunds’ Marmalade, various cookie recipes from Mrs Mat, Miss Lyner, Aunt Annie, Mrs Murch and more; the emergence of products like Heinz Ketchup (1876)and Rice Krispies (1928); the inclusion of war-time & depression era recipes, that minimize the use of ingredients like milk and eggs. It really is an incredible read.

After much contemplation, this morning my mom and I decided to make pull-taffy. Alongside the notes in the book, my mom shared her own memories of making this with her own mother — and how handling the taffy helped her develop “Jarvis Fingers” (ones with so few nerves left in them that handling near-boiling taffy isn’t a problem. I do NOT have Jarvis fingers, though may have started developing them today!).

In any case, on a dreary Monday morning, this was the perfect project to work away on. For anyone looking for a sweet pick-me-up, I highly recommend trying the following…

Materials

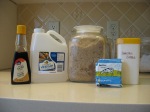
  • 3 cups brown sugar
  • 1/2 cup white vinegar
  • 1/2 cup water
  • 3 tsp butter
  • 1/2 tsp baking soda
  • vanilla
  • big pot
  • wooden & metal spoons
  • waxed paper
  • a big tin or glass/ceramic dish
  • extra butter for greasing the above big tin or glass/ceramic dish

How to do it!

  1. Before you start anything, grease your final tin/pan really well. Give it lots of butter. This will make a big difference later.
  2. Put the sugar, vinegar and water in the pot and stir well.

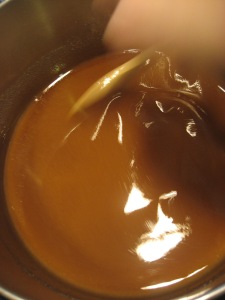
    Before putting it on the boil

    Put this mixture on the stove on high heat and bring to a rolling boil.

    Minute 3 - it's almost on the boil!

    Once the mixture is on the stove, DO NOT stir anymore. Just watch it & make sure it doesn’t burn. Once it’s on the boil, you want to keep it rolling but may want to turn it down to medium heat.

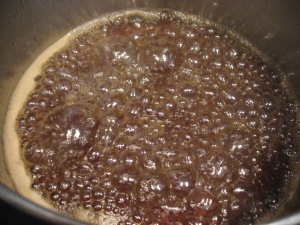
    Boiling!

    Let it boil for about 10 minutes, and watch the transformation take place.

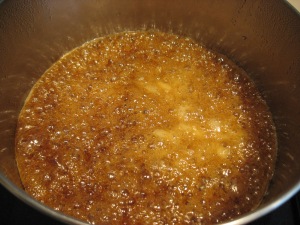
  3. Once it’s boiled for 10 minutes, add 3 tsp butter. Again, DO NOT stir, just let it do it’s thing.

    Boiling with the butter added.

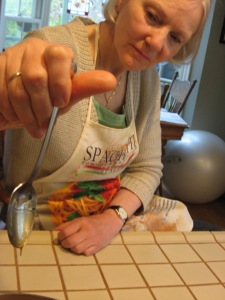
    Let it keep boiling until it hairs. This may take a while. To test for “hairing”, dip a metal spoon in the mixture and lift out.

    Too drippy - not ready yet!

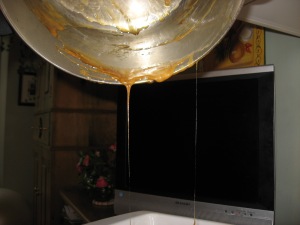
    If the taffy drips off the spoon, it’s not ready. But if it starts making hair-like strings, you’re set!

    Look at those hairs!

  4. Just before removing from the stove (or fire, as Lydia Lush writes), add your baking soda (which should be dissolved in a wee bit of hot water) and vanilla. This time, you can stir, but just a little.
  5. Pour the taffy into a buttered tin. You’ll see lots of evidence of the hairing here.
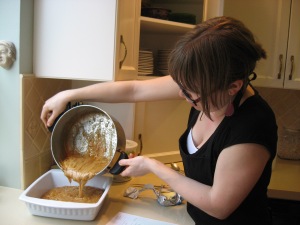
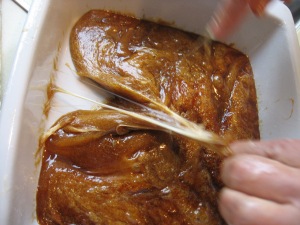
  6. This is the fun / painful part. The taffy will start to cool faster around the edges of your well-greased pan than in the middle, and ideally you want it to cool uniformly. So, you need to get the cooler taffy into the middle  by pulling it. Now, while this sounds straightforward, you’re basically having to put your fingers in ridiculously hot, sticky liquid. If you don’t have my mom’s Jarvis fingers, this is really painful. One way to help with this is to grease your hands up so the taffy won’t stick to your fingers as much. Please, please, please be careful with this part.

    Pulling the Taffy!

  7. Keep on lightly pulling the taffy to the centre until it is cool enough that you can hold a ball of taffy in your hands. You’ll likely want to re-grease your hands several times throughout.
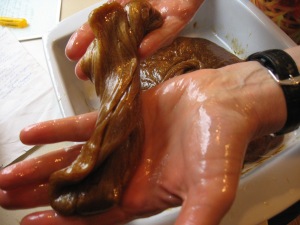
  8. Now comes the real pulling. Work your taffy by pulling and twisting it over and over again, and feel the consistency change as the taffy cools and hardens. It will also change colour. Once your taffy is a golden straw-like colour, and fairly firm, you’re done.

    We didn't get many photos of this stage because you have to work fast and our fingers were covered in butter, but you get the idea.

  9. Lay out some waxed paper, and pull the taffy into long snake-like shapes, and twist it up.
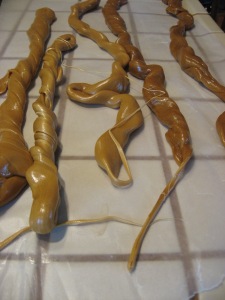
  10. Let it sit until it’s hard like brittle candy, and then smash it up (using the back of a knife or just pure force!) into bite-size pieces.
  11. Enjoy – and don’t forget to brush your teeth after consuming!!!
Read Full Post »

Sometimes, I feel really out of place in the world.

While others are downloading apps for their iphones, jetting around the world for long-weekend vacations, and tweeting up a storm, I seem to be purposefully grounded in a different era. An era of writing letters by hand, of square-dancing on Saturday nights, of afternoon tea and quilting.

When I think of where these values and eccentricities come from, the first thing that jumps into my mind is my mom.

This is my Mom!

There are a bagillion things I could say about how amazing she is. How every Christmas, she writes close to 200 Christmas cards by hand, building community and staying lovingly in touch with people she hasn’t seen in 30 years. How she was at every flute performance I gave for 15 years, breathing in sync with me while sitting in the audience, sharing every pang of anxiety, every long-phrase, every after-performance thrill. How she’s always answered my ridiculous requests to learn to smock, knit, bake, sew, embroider, darn, quilt (the list goes on) with patience and love.

She is truly the most incredible woman that I know. And I am grateful that she raised me to value these trades & skills rather than forget them.

Last spring, about 4 months after I moved to Toronto, she came to visit. As we sat, sipping tea in my living room, she unzipped her suitcase and began pulling things out for me – photos of friends I hadn’t seen for some time that she’d printed off for me, a copy of a letter that I wrote when I was 8 that she found and thought I might get a kick out of. And then, an autoharp. An ice cream maker (that my sister eventually took). And finally … a yogurt maker!

All of the things she produced that day have brought me endless joy (I still laugh when I think about that letter, telling the

The first political letter I wrote!

government that I would busk on the street to make money to solve the budget problem). But the yogurt maker takes top prize for the most well-used. And brings me to today’s post…

How to Make Yogurt!

My Yogurt Maker!

A note before we get started. Yogurt makers are great – I love mine to bits. But they aren’t necessary. Yogurt makers keep the culture at a set temperature (slightly warmer than room temperature) in an air-tight container. This is handy, for sure, but you can also just monitor the temperature yourself and use another air-tight container.

Materials

  • 1 litre whole milk
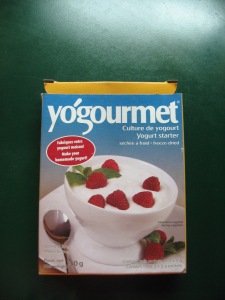
  • Yogurt Starter (see below for details)
  • A pot
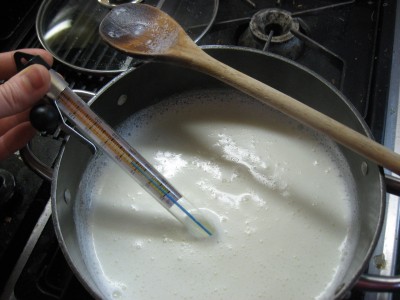
  • A candy thermometer
  • A yogurt maker, if you’re using one
How to do it!
  1. Pour 1 litre of milk into a pot and stick it on the stove. Bring it to ~85C (you want to do this over low-med heat so that it doesn’t burn or catch on the bottom) or to the boiling point.
  2. Let the milk cool to ~42-44C.
  3. When the milk has cooled, take about 1/2 cup and stir in your culture until it’s well mixed/dissolved.
  4. A note about culture! I used a 5g package of the culture shown here. This makes great yogurt. You can, however, also use the end of your last batch of yogurt (or yogurt you’ve bought from the store). About 2 Tbsp should be enough. 
  5. Add your 1/2 c. of milk with the culture back into the pot and stir well.
  6. Transfer into your containers. You want to create a little incubator for your yogurt(s) so that the bacteria can grow and flourish. If you’re using a yogurt maker, as mentioned above, it will do this for you. Each make is different, but you usually keep them plugged in for about 5-6 hours. If you’re not using a yogurt maker, you want to make sure your culture stays at about 38C. You can do this by placing your jars of yogurt (make sure they’re tightly closed) in a bath of warm water. Keep an eye on it to make sure it stays warm.
  7. After your yogurts have sat for 5-6 hours, stick ’em in the fridge overnight to cool and set.
  8. Voila! You have yogurt! Eat and enjoy!
Once you get this down pat, you can experiment with different flavours — the possibilities are endless!

Read Full Post »

The Master Maple Maker, Jen V!

This week, 52 Projects features a guest blogger. You may recognize Jen V. from such posts as “A Mallow Day Off“. A former roommate and constant partner-in-silly-crimes, Jen has always been a source of DIY inspiration to me, especially in her life as a designer of recycled clothing. This week, Jen takes us through her experience as master-maple-maker, taking over her dad’s backyard maple syrup operation. Trust me, it’s worth sticking around for the ride.


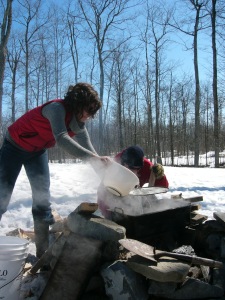
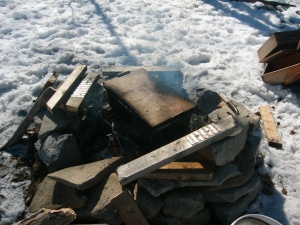
Three years ago, my Dad and I decided to turn his yard into a maple syrup factory. He lives on a lot that is 75 metres by 75 metres with a bunch of maple trees and enough room for a fire pit (it wasn’t until year two that we discovered the importance of boiling the sap outside) which was the perfect combination for the establishment of a makeshift sugar shack.

In our first year we tapped one tree, boiling all of the sap over the stove in the house. The end product was runny, and we turned the house into a sauna. (Note: You have to boil off an average of 40 litres of water from the sap to get one litre of syrup!). But the excitement of creating this sweet tree nectar from our own backyard gave us enough incentive to increase production the next year.

Each year we’ve added a few more taps, and this year when my Dad announced that he was going down south for the second week of March – prime maple syrup time! – I declared myself  head apprentice of our production which now has 14 trees.

Materials

Drill (with a 7/16” drill bit – auger works best)

Hammer

Tap, bucket & lid*

Big bucket or container (holds 5L or more)*

Pan & lid (the bigger the surface area the better)*

Screen (the kind that you put over a frying pan when you’re frying bacon)

Fire pit with a rack

Kindling and firewood

Candy Thermometer*

Stovetop pot

Filter

Jars or bottles & lids*

Funnel

*If you don’t already have these and can’t find them at your local hardware store, try a rural hardware store. If it’s in an area with a lot of maple trees, odds are they will sell all of the maple syrup making supplies that  you could ever need.

How to do it!

When to tap

Maple trees pump their sap from their roots up to their branches as the weather starts to warm up at the end of the winter. In Ontario, this usually starts in early March, and when the sap is flowing, it’s time to start tapping. I don’t have a surefire trick to know when it’s time to tap, so I keep me eye on the temperature and use that as a guide. When the temperature starts creeping above  freezing in the day time but stays below over night, I’ll tap a tree to test. If it runs, all of the taps go in and stay in until the sap stops running which can be anywhere from a week to three weeks later.

Tap the trees

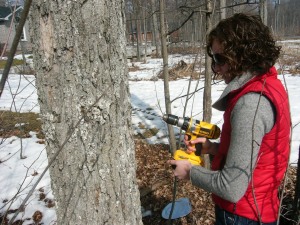
Find a sugar maple tree. You can use other types of maples, but these have the highest concentration of sugar in their sap. Make sure the tree is at least 18” in diameter. Pick a spot that is chest height and drill a 4-inch deep hole into the tree, pointing slightly upward so gravity will draw the sap down.

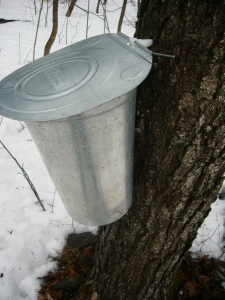
Insert the tap, and use a hammer to tap it in to the tree until it is snug. Hang the bucket, affix the lid and you’re ready to go.

Boil the sap

Use the big bucket or container to collect the sap from your trees. The sap will keep for about a week if it’s refrigerated, forever if it’s frozen, and only a few days if it is left out. Set up your pan over the fire (an outdoor stove or bbq will also do the trick), fill it halfway with sap, pouring it through the screen to filter out debris.

Place the lid on top, leaving it slightly ajar so that the steam has a place to escape. If your pan doesn’t come with a lid, a slab of plywood will work. Check on the sap level every 30 to 45 minutes, and continue adding sap to the pan. As the sap gets darker (after 12-14 hours of boiling), start keeping your eye on the temperature. When it reaches 102-103 C, take the sap off the fire and pour it into a stovetop pan. The rest of the boiling will happen inside over a stove so that you have control over the temperature.

Filter the sap

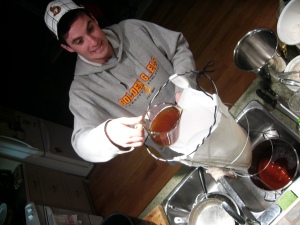
Before boiling it down to syrup, pour the sap through some kind of filter. You can buy a special re-useable maple syrup filter (we prop ours up with a metal tomato cage), or use coffee filters.

Turn it into syrup

With the sap in a stovetop pot, put it on your stove on high heat. Turn your overhead fan on so that the fan (as opposed to the walls of your house) absorbs the excess moisture. Once the sap comes to a boil, lower the element to medium heat, and keep the sap at a rolling boil. Using the thermometer, bring the sap up to 106C – this will leave you with a nice thick syrup.

For your first batch, let the syrup cool to room temperature. If the end product is too runny, you’ll need to bring it to a higher temperature. Experiment with one degree differences until you find the perfect temperature to get the consistency of syrup that you like.

Preserve it

Because syrup has such a high sugar content (which acts as a natural preservative), I don’t worry too much about canning it perfectly. Having said that, I lean more towards glass jars and bottles because you can sterilize them easily in the oven.

If your syrup storing containers are glass, sterilize them by putting them in the oven at 200F for 10 minutes. Make sure the syrup is hot. Using the funnel, fill each jar with syrup. If your containers are plastic, make sure they are washed out, that the syrup is cool, and then fill them up using the funnel. If you are using actual maple syrup bottles, you can buy brand new lids each year that will seal when you first put them on. Mason jars are another easy option, and snap lids can be found in almost any hardware or grocery store.

Thanks Jen! For those in the Toronto area, check out this amazing organization Not Far From The Tree that taps maple trees in the city!

Read Full Post »

Let’s recap:

We left off our characters on a beautiful Sunday afternoon, smiling, scheming and crafting. The plan? To make rice krispie squares from scratch – i.e. with all ingredients made from scratch. The epic success of the butter created a somewhat inflated sense of how easy this was going to be. The marshmallows had worked in the past too. All that was needed was puffed rice. How hard could that be?

… little did they know.

But let’s not get ahead of ourselves.

After deciding to take on this challenge, the Fraser sisters started googling away to see how to puff their rice. Surprisingly, the usual plethora of google options weren’t coming up. But, in between the conversation forums talking about “gun puffing” techniques (scary!) we found this video.

Ginger ale!” I exclaimed after watching it. “I know how to make that too! This is amazing!”

Except that it totally didn’t work.

Before - when I was still so sure this was going to work.

After. Enough said.

Our next attempt was trying to pop rice like pop corn. I’ll save the polemic and skip to the chase – it failed too.

So, friends, please – your thoughts, ideas, and help on this one. How on earth do you make puffed rice? I’ve read more about getting more moisture into the kernel in order to pop it like pop corn, but have had absolutely no success.

Help!

Read Full Post »

I love Sundays. The possibility, the creativity, the calm. They make me smile.

This Sunday was spent with Chris Kay, laughing, making sock monkeys and eating too many chocolate covered almonds.

At one point in the afternoon, riding the wave of one of our sugar highs, we had an absolutely incredible idea. We decided we would make a batch of rice krispie squares from scratch!

Ok, I realize this doesn’t sound all that radical, but by “from scratch” we meant making our own puffed rice, and butter, and marshmallows, and then turning them into the squares. It would have been the first 52 Projects project where we went 2 steps back in the production cycle with the “from scratch”-ness. Except for the epic failure that happened.

But that comes later. First, the epic success…

Making Butter

Materials

  • 500 ml whipping cream (preferably organic)
  • A big jar
  • 2 strong hands
  • A strainer

How to do it!

  1. Carefully pour your whipping cream into a large jar. Close it tightly.
  2. Start shaking.
  3. Shake it. Sh-sh-sh-shake it. Shake it like a polaroid picture.
  4. Watch as the transformation happens.

Minute 1.

Minute 7.

Minute 13 and 21 seconds.

Keep on shakin!

Ah! It's coming! Minute 16.

The end is nigh. Minute 21.

Once you’ve got your butter in the jar, strain it out. The leftover liquid is buttermilk, and fantastic for baking! Chill the butter for a bit, and enjoy… It really is amazing!

The Final Product!

I think this has truthfully been my favourite project to date — so simple, so fast, and the transformation over those 21 minutes was like magic.

… if only the next part had the same success.

To be continued…


Read Full Post »

It’s catch up week(s) on 52 Projects! That’s right folks – all those lingering posts you’ve been emailing me about are finally getting polished and posted.

First up – a guest blog from the wonderful Chris Kay, aka my sister. She taught me how to make this granola, and let me just say, it really does make you friends. Try it. I promise.

***

Hey All!

Chris here, Elizabeth’s trusty side-kick and sister, filling in for this granola how-to.

Firth things first: This granola will make you friends. Every time. I gave it to my neighbours and bam, I had a spare key and an invitation to use their jacuzzi anytime I wanted. That’s why it’s save-the-world granola. Because friends and neighbours are the answer.

Also, before we begin, I’d like you to WIPE CLEAN any assumption that all granola is healthy. Gone? Good. That’s better. This can be our little secret. The assumption of health is one of the things that makes granola great. You will watch people smile wide while piling this into their mouths, saying things like “nutritious AND delicious!”  and you’ll smile too, knowing that they’re half-right. And frankly, it’s the only half that matters for the limited period of time that they’ll spend eating in front of you.

Props go out to The Hillbilly Housewife for the recipe that I based this one on.

Alors. Here we go.

You will need:

  • Mixing bowl
  • Big cooking pot
  • Mixing spoon
  • Baking tray(s)
  • Oven
  • Oven mitts

Ingredients

  • A big chunk of butter, around half a cup (see?)
  • 2 nice big handfuls of brown sugar (see?)
  • A good splash of water, maybe 1/3 of a cup.
  • A whole bunch of oats (Full-flake is best but I sometimes mix in some quick oats for fun. Just not steal-cut.)
  • A light sprinkle of salt
  • A generous sprinkle of cinnamon
  • A generous sprinkle of nutmeg
  • Around 2 cups of roasted-but-not-salted almonds
  • Around 2 cups of crystallized ginger

How to do it!

First you need to melt and warm the wet stuff. Throw the butter into a big pot and melt it up, with the water. Stir in the sugar and the salt.

Then, quick as a bunny, mix in all the oats, so that the liquid doesn’t get all absorbed by the first ones to fall into the pot. This should mix into a moist blend, which holds together a little if you pinch a spoonful or so between your fingers, but it’s not wet. You want some little chunks, they are the best part.

If it’s too wet, it will take too long to bake, so add oats. If it’s too dry whip up a little more melted butter and water, and stir it in.

It sounds complicated, but with this ingredient list, you really can’t go wrong.

Spread it out on a couple of baking trays. Sprinkle the cinnamon and nutmeg on top.

Bake it up! I do it around 325-350 for around 20-25 minutes, but really, just pull it out when it smells delicious. You’ll know it’s finished if the little chunks are crispy on the edges and the moisture is mostly out of it. (When I’m really good, I take it out to stir it half-way, but this isn’t essential.)

When you take it out, let it cool for a while, and then pour it back into your mixing bowl. Stir in your almonds (whole) and your ginger (cut up into little pieces.)

Package it up in a mason jar, make a cute little label, give it to someone fabulous, aaaaand, save the world, just a little bit.

Enjoy!

“Hey wait! Can I innovate and make other kinds?”

I’m so glad that you asked. Ab-so-lutely! Kick those almonds and ginger-chunks to the curb and make dried-blueberry and flax, or hemp and chocolate (mmmm, stir the chocolate chips in while it’s still hot and they’ll get all melty and delicious) or, or or… sundried tomato and basil? Pickle and thyme? The only limits are in your imagination. And maybe your friends’ taste buds.


Read Full Post »

A Cheese-y post


I’ve been feeling very cheese-y this weekend.

The Rusholme Family... a big part of this week's cheesiness

Last week was the one-year anniversary of my moving to Toronto. It’s been an eventful year, and looking back, it’s easy to remember all the hard moments. But then there are weekends like this one – filled with good friends, beautiful conversations, sharing food, playing music, being outdoors – and it reminds me that throughout it all, a beautiful home and community has evolved around me. It’s amazing…

Alongside all the cheese-y feelings that have  been pouring out of me has been a lot of actual cheese. Homemade cheese! Enter this week’s project.
When I originally saw the “make cheese” idea go into the hat, I thought that perhaps I could take a course or get my friend Ruth at Monforte Dairy to show me the real deal for making hard, aged cheese. But when I pulled it from the hat this week, neither of those options were possible. I’m still hoping that before the end of the year, the perfect cheese making opportunity will arise, but this time I decided to take an easier route and learn to make ricotta cheese, to be served at today’s Bluegrass Brunch. Here’s how it happened…
Materials
  • 8 cups (2 litres) organic whole milk
  • 1/2 tsp salt
  • 5 Tbsp white vinegar
  • A large saucepan
  • A slotted spoon
  • A sieve
  • Cheese cloth
  • Candy Thermometer
How it’s Done!
  1. In a large sauce pan, slowly heat the milk and salt over low-to-medium heat, stirring often until the milk reaches 203F / 95C. This takes a really long time. 1.3 episodes of Doctor Who to be exact (or for you non-Doctor-Who people, 55 minutes). I highly recommend having someone or something to entertain you during this process!
  2. Add the vinegar, and slowly stir the mixture 3-4 times.
  3. Remove from the heat and let the mixture stand for about 20 minutes. You’ll be able to see the curds (the cheese) separating from the whey (the yellow-green liquid left over)

    Look at those curds and whey!

  4. Line your sieve with 2 layers of cheese cloth and place it over a bowl. Using your slotted spoon, skim off the curds and place them into the cheese-cloth-lined sieve.
  5. Let the cheese drain for about 30 minutes.
  6. Transfer to an airtight container and chill. Then serve! The cheese should be good for about 2-3 days.

Other than the hour spent standing over a hot stove trying to constantly check the temperature of the milk, while stirring, this was a totally easy and fun project! And even better was putting home-made ricotta on top of beautiful blueberry waffles, made by the wonderful waffle-maker Nico at today’s Bluegrass Brunch


Read Full Post »

A Green Meal

During the summer of 2009, I found myself bouncing around the UK on a series of adventures. One such adventure included a month in Taunton, Somerset with my wonderful friend Alice. Alice’s family was in the process of renovating an old farm-house complex and

From the Roughmoor Photo Shoot

Alice and I spent our days stripping wall paper, prepping walls, filling holes and redecorating. After hours, we were known to make delicious organic plum tarts, coordinate hilarious photo shoots, and dance ridiculously to the Scissor Sisters.

About half-way through my time in Taunton, our friend Laura came to visit. One night over dinner, we somehow got onto the question “if you had to eat one colour of food for the rest of your life, what would it be?”

A pretty hot debate ensued, and eventually both Alice and I decided on green.

“Then do it!” said Laura. “Eat only green food for three days.”

And we did.

It wasn’t the prettiest three days of eating by any means, but Alice and I were determined. Our lowest point

Mung Bean Mush.... ugh.

was a morning meal of mushed up mung beans and peas topped with toasted pumpkin seeds – trust me, it’s not the breakfast of champions. But we survived, and sat down to a nice big piece of chocolate cake at the end of Day 3.

I had almost forgotten this hilarious ordeal until mid-way through this week’s project. Because it’s the first week back to work, I decided to pull an easier project, and out came home-made pasta. I should say now that I didn’t end up making green pasta, but when the pasta was finished and ready to be made into a proper meal, I realized that I only had green things in my fridge.

So this post is dedicated to Alice – one of the only people in the world crazy enough to eat only green foods for three days with me.

How to Make Pasta!

Materials

  • 1.5-2 cups all-purpose flour

    Ingredients!


  • 3 eggs
  • 1/4 tsp salt
  • rolling pin (or old wine bottle!)
  • drying rack

How to do it!

  1. To start, you want to make an almost-erupting volcano of flour and eggs. On a clean surface, dump 2 c. of flour and make a big mound with a crater in the center. Add the eggs into the crater, followed by the salt.
  2. Using a fork, whisk the eggs and salt together. Slowly start adding flour from the sides of the volcano to the eggs as you whisk. I found that I had wayyy too much flour when I made this, but this may have been because I added it too quickly. In any event, your end product should be a semi-soft dough that forms into a ball a bit smaller than a softball.
  3. Kneed your dough for 10 minutes. Shape it into a ball, cover it in plastic and let stand for 1 hour.
  4. Now, if you have a fancy pasta machine, you can use it and save the bother of the next steps, but they’re expensive and I found a good rolling pin (or wine bottle in my case) did just the trick! Start by splitting your ball into three pieces and work them one at a time. Roll your dough out lengthwise, making it as even and thin as possible. The dough will be elastic-y, so this can be tricky. I used a combination of rolling and using my hands to stretch it out, taking about 5-7 minutes per ball of dough.
  5. Once you’ve got the dough stretched out, hang it on a drying rack for about 15 minutes.
  6. Next, roll each length of pasta up so it looks like a scroll (or jelly roll), and cut to create long pieces of linguine-type pasta.
  7. Let them hang for a few minutes as well, until they are leathery in texture.
  8. Boil up some water, cook ’em up and voila! you have the perfect meal.

My perfect meal also included pesto, steamed greens and roasted pumpkin seeds, making it beautifully green, with a wee bit of Monforte Dairy cheese on top (amazing!), and was shared with friends over an intense game of Seafarers of Catan and the Christmas special of Doctor Who. Nerds? Perhaps, but it was one of my favourite nights of 2011.

Read Full Post »

For the last 8 years, I’ve been on-and-off involved with an organization called The Otesha Project. Otesha was the organization that helped first develop my social conscience. Otesha provided me with transformational life experiences (like biking across BC). And Otesha has brought some of the most amazing people into my life.

Jen V. strategizing over Carcasonne

Enter Jen V. One of these amazing people. Jen has been a co-worker, a roommate and will always be an amazing partner in crafty crime. When we lived together, we spent most of our time learning the harmonies to our indie rock favourite songs, eating popcorn, playing board games and working on crafts. Pretty much my ideal roommate situation.

This week, Jen visited Toronto, which clearly called for taking a day off dedicated to indie rock music, crafty projects and board games.

We’d now like to present to you…

How to Make Marshmallows from Scratch!

According to the ever-wise Wikipedia, marshmallows have existed as a candy since ancient Egypt, when they were made from sap extracted from marshmallow plants. This was a pretty labour intensive process, so in the 19th century, the French came up with the idea of using gelatin and corn starch as a base. Enter the era of mass produced ‘mallows, resulting in generations of roasted marshmallows, rice krispie squares and ‘smores.

Equipment

  • Candy Thermometer
  • 2 metal bowls
  • 1 sauce pan
  • 9″ x 13″ pan
  • waxed paper
  • rubber spatula
  • measuring cups
  • scissors

Ingredients

  • 1/2 cup cold water (add ice cubes for a few minutes to make it extra cold!)
  • 3 envelopes (~3 Tbsp) unflavored gelatin
  • 2/3 cup corn syrup
  • 2 cups white sugar
  • 1/4 cup water
  • 1/4 tsp salt
  • 1 – 2  Tbsp vanilla extract or other flavorings (we did 1 Tbsp vanilla, 1 Tbsp peppermint flavour!)
  • 2 cups powdered sugar
  • Corn flour / Cornstarch
  • Icing sugar
  • Food colouring (if you want)

How to do it!

  1. Start by prepping your pan. It’s way easier to cut the marshmallows at the end if you line the pan with something like plastic

    The Prepped Pan!

    wrap or waxed paper. Then grease the lining with a wee bit o’ oil. Finally, mix together about 1 cup of cornstarch and icing sugar (1/2 cup of each) and lightly sprinkle your pan with the mixture.

  2. Get your water nice and cold (add ice cubes if necessary). Put the gelatin into a metal bowl and then add 1/2 cup of water. It will start to “blossom”. Set it aside for about 10 minutes to let it react.
  3. In your saucepan, mix together 2 cups white sugar, 1/4 cup water and 2/3 cup corn syrup. Bring

    Jen watching the thermometer

    this to a boil. Using your candy thermometer, keep it boiling until the mixture reaches 117C / 224 F. Make sure the thermometer is submerged in the candy, but not touching the bottom of the pan. We got really intense about this part. Once it hits 117C, remove the pan from the heat.

  4. Add the warm mixture to the “blossomed” gelatin and start mixing like crazy. If you’ve got an electric beater, you can wimp out and use it. If you’re hardcore like Jen and I, you’ll whisk it by hand. By the end, you’ll have huge arm muscles like this.
  5. Mix for 15 minutes, adding 1/4 tsp salt as you go. Towards the end add your flavouring and (if you choose to) colouring. The mixture should be quite thick and gooey at the end.
  6. Spread the mixture into your already prepared baking pan and dust the top with the icing sugar/corn starch combo.
  7. Then, put it aside and let the pan sit for 4 hours to set.
  8. While you’re waiting, go to Snakes and Lattes and play your favourite board games. We went for Wasabi and Carcasonne. And,

    Cutting the 'mallows!

    you know, to be humble, I’d just like to point out that I won both.

  9. Come back and lift your marshmallows out of the pan. Cut ’em up, dust all sides with more cornstarch/icing sugar and enjoy!

This was a totally surprising activity. Totally fun. Totally easy. And the final product is super yummy.

… now we just have to wait for summer time to try roasting them!

Thanks to the ever wonderful Jen V. for the inspiration and hilarity.


    Read Full Post »

    Play… d’oh!

    “We do not stop playing because we get older, we get older because we stop playing.”

    ~ Einstein

    Einstein! Honesty. Einstein said that.

    Playing is just plain good. It reminds us who we are, it chills us out, and it keeps us on the roads we’re supposed to be on. That’s what I think. Julia Cameron, in The Artist’s Way, said:  “Discipline is a weak battery.” In order to move forward with anything, we need to find out sense of fun, play and enthusiasm.

    So, this project is all about play, play. Dough.

    Turns out that making playdough is crazy-easy! Here’s the dirt:

    Get a big pot, put it over medium/low heat and throw in:

    2 cups flour
    1 cup salt
    2 tablespoons cream of tarter
    2 cups of water
    1 tablespoons oil (I used olive)

    Stir it constantly! It’ll thicken up really quick. Then pull it out and kneed it for a bit, and presto!

    Because I wanted to be really DIY, instead of regular water, I used the natural dyes I’d made for the last post. I also made some fresh dye by simmering turmeric. I added a *little*  food coloring to make some extra colours and added some essential oils for scent. The mega-huge amounts of salt kinda drowned out the fragrances, so I don’t recommend that last step.

    The last step is easy: Play! Personally, I recommend an art picnic to do this. Invite friends over, and have them all bring some creative ingredient to add to the mash. Googly eyes, sparkles, feathers, pipe cleaners, magazine pictures, dracula teeth… the possibilities are endless.

    I timed this well because I’m lucky enough to have an art picnic every 2nd Tuesday with group of brilliant women who also run creative businesses in the east end. We get together (at the sweet ‘ol Only Cafe,) drink lattes, make artsy stuff and talk about our how work is going. We also help each other out with promotions, so, ahem, that is: Jenn Hicks, Jamie Ridler, Danette Relic, Kim and Amy Sedgwick and yours truley. These women truly rock.

    This week I arrived with a big pyrex of play dough, and happy mayhem ensued. I couldn’t share it with you without a little help from Macy, so without pause… here’s yesterday. (Warning: there is some adult content here.)

    Read Full Post »

    Older Posts »