Feeds:
Posts
Comments

Archive for the ‘textiles’ Category

It seems an odd time to be felting hats. Outside, I am convinced that spring has sprung. Sure, there may still be some snow on the ground, but since the clocks sprung forward and the glorious sun has decided to stay later in the day, it feels very spring-like indeed.

Our soon-to-be veggie garden!

These past two weekends have been gloriously un-scheduled for me – a rarity after the past 3 months, and a luxury that I have been bathing in. Each weekend morning has started with roommates congregating in the sun room, books and big mugs of tea in hand, to laze around in the morning sun. Last weekend, Ashleigh and I got a bit ahead of ourselves and even started our seedlings (probably not the best timing, but we were riding the wave of spring-excitement and nothing was going to stop us!). And this weekend, it’s been all about crafting.

After felting with the Barter Babe a few weeks ago, I started reading more about other felting methods, like needle felting (still to be tried) and felting by knitting an item and throwing it in the wash.

I’m a big fan of knitting, and have become a bit of an expert at beanie hats. This winter along I churned out 6 of them – they’re fast, easy, and everyone can use them. But truth be told, I was ready to spice things up a bit. Enter the idea of making a oversized beanie hat and felting it down.

Materials

  • 100% wool yarn
  • A pair of size 9 needles
  • A pair of size 6.5 needles
  • A large eyed hand sewing needle
  • Laundry Soap
  • A washing machine

How to do it!

  1. To start, you need to knit your hat.

    Big Hat!

    I had read that when you felt in a washing machine, things shrink about 30%, so I took my favourite hat pattern (see the end of the post for the pattern) and made it about 30% bigger. This was WAY too big.

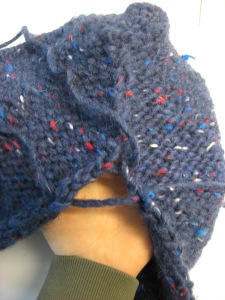
  2. The hats I tend to make are on straight needles, so at the end you need to take your piece of yarn and use a hand sewing needle to stitch it together to become a hat. Kind of like this…
  3. The basics of felting are just like those described in my previous felting post. Hot water, soap and agitation basically causes the wool fibres to cling to each other for dear life and thus shrink in size. Last time, we did this by hand, but this time I tried using the machine.
  4. Put your machine on the smallest size setting, and the hottest water setting, add some soap and your hat and get started.
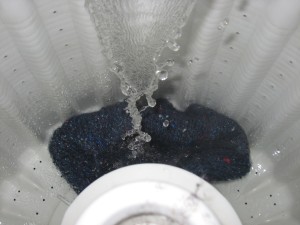
  5. In retrospect, I should have not allowed the washing machine to complete a full cycle, but instead should have kept it on the agitation cycle until the hat was the right size. But, this didn’t occur to me until later. So I just kept putting it into the wash over and over again and watched its progress. (I shudder to think of the amount of water I wasted in this process… yikes!). In any case, the progression was fairly amusing…

Before starting to felt. The hat was REALLY big.


After machine wash #1. Not much smaller.


After machine wash #2. Getting there. But I still look like a mushroom.


After machine wash #3. A fuzzy army helmet.


It totally almost fits!!! (This is after I caught on and kept the machine on the agitation cycle for the equivalent of three washes)


Woo! The Finished Product!

Other than the incredible amount of wasted water that occurred (which I feel completely and utterly guilty about), this was a totally hilarious project. In retrospect (again), I would have knit a hat somewhat smaller in size (maybe 15% bigger rather than 30%) although the density of the hat upon completion is fantastic!
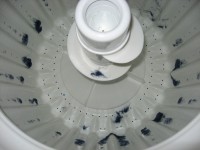
The only real downside was the state of my washing machine after the process was over…

how cool does this look?

The Hat Pattern

For those who want to make a beanie hat, here’s the pattern. The initial numbers are for a regular sized hat, and the ones in brackets are for the one I made to felt (not necessarily recommended)

Cast on 54 (80) stitches on Size 9 needles.

R1: K2(4) P2(4) to end.

R2: P2(4), K2(4) to end.

Repeat until ribbing is 2″ (4″) long.

Then, switch to Size 6.5 needles. Follow the pattern of knitting a row, and purling a row until you have completed about 6″ (10″) from the bottom (ie included the ribbing).

Then you start to decrease. **K6 (10), k2 tog.** Repeat the pattern between the ** to the end of the row. Then purl a row. Next **K5 (9), k2 tog**. Repeat to the end of the row. Then purl a row. Continue in this way until you K2 tog for each stitch. You should be left with ~10 stitches on your needle.

Cut a long end off your yarn, and use your large-eyed hand sewing needle to pass the yarn through the remaining stitches and sew up the hat. Voila! You’re done!
Read Full Post »

Is it just me, or has there been a surge of absolutely incredible DIY-type projects lately?

My latest find (and by far the coolest project I’ve seen to date) is Barter Babes. For one year, an incredible financial advisor is bartering her services with 300 women in Toronto. No money is exchanged. You offer her a barter, and in return you get a 1-2 hour financial consultation.

I could (and possibly should) write a whole post about how great my experience with Shannon was — the advice she gave, the empowerment I felt, the concept of making sound financial advice available free of charge for women all while making bartering a more “mainstream” concept? Absolutely incredible.

My bartering offer to Shannon was a night of DIY fun — a sampler of 3 different DIY projects, a-year-from-scratch style, all in one night. Last night happened to be the night, and let me just say, it was totally fun.

We started off with a little butter churning. This remains my hands-down favourite project so far. If you haven’t checked out the post and started shaking up some cream yourself, go and do it now. It only take 20 minutes, some cream and a jar, and it’s tremendously fun.

Next up was lip-balm making. Another personal favourite. One batch made 14 containers, meaning that I have a new batch of little birthday and hostess presents on hand for future needs. Always good.

And finally, we felted.

About 5 years ago, I spent a summer working in BC for the Sierra Youth Coalition. Part of my job included offering felting workshops for young kids. I remember it being really fun, but somewhat nonfunctional. Each kid make a felt picture, and we had lots of ideas of turning them into a yurt, but in the end, nothing happened with them. It never really occurred to me that you could do other things with felt, until last night.

After a bottle of wine and with two successful projects under our belts, Shannon and I waded into the world of felting. For starters, we each just felting a rectangular patch (easily turned into a change purse or pouch). I’ve got plans for a hat later today, but that will be for the next post.

In the meantime, here’s what you need.

Materials

  • Wool fibre. You want un-spun wool to felt. Not yarn. I got several bags of “roving” (long, narrow bundles of fibre, often used for spinning wool) of various colours from my favourite Toronto store, Romni Wools. If you can get big swaths of wool that’s great too.
  • 2 pieces of bubble wrap or screen (like the screen you’d use for a back door in the summer time)
  • Hot water
  • Dish soap

But wait, what is felting?

Good question! Have you ever accidentally put a wool sweater in the wash, and had it shrink? If you answered no, I don’t believe you, because I’ve done this a few too many times.

Basically, each wool fibre has little microscopic hooks on it that like to cling together. When wool is subjected to a combination of soap, hot water and agitation, these hooks are activated and cling to each other for dear life. This causes the wool to shrink down and become dense and compact.

When you’re felting, you’re basically trying to make this happen by hand. How do you do this? Good thing you asked…

How to do it!

  1. To start off, cut 2 pieces of screen to be of equal sizes. Ours were about 1 ft x 8 inches. Your end product will shrink down about 20-30% of its original size, so you want your screen to be about 20-30% larger than your desired finished product.
  2. The next step is to lay your wool out on your screen in the desired pattern you want. To do this, hold the roving in your dominant hand, about 5-6 cm from the end. Using your non dominant hand, grab the end of your roving and firmly pull a piece off.

    Holding your roving, ready to pull!

    The wool fibres will naturally want to hold onto each other (remember the hooks?) but the hooks haven’t full bound to one another so you should be able to pull tufts of fibre from the end fairly easily.

    The tuft, after having been pulled from the end of the roving.

  3. Lay your fibre tufts down with the fibres all going in the same direction. This means that the hairs of the fibres should all be either vertical or horizontal. The layer doesn’t need to be too thick (you can pull the fibres in all directions to thin them out a bit) but feel free to layer different colours over each other to make a complete layer.
  4. In total, you want 3 tiers of fibre, layered on top of each other, alternating the direction of the fibres. So if you did your first layer with all the hairs pointing vertically, make the next horizontal and the final one vertical again.
  5. Remember that you’re going to be able to see the pattern of the wool on each side, so if you want to create designs, layer colours, etc. go ahead and do this!
  6. Once you have your three layers, put the second piece of screen on top, making a sandwich (screen-fibre-screen) and move to a location where things can get messy (we used my kitchen counter).
  7. Now it’s time to become a human washing-machine. Take the top layer of screen off, and drizzle dish soap over your wool. You don’t need a ton, but want to get some good suds action going on. You can see how much I used here.
  8. Dribble about 1 c. of hot water over your wool and replace the top screen.
  9. Start agitating. You want to be gentle at first, to ensure that the wool stays in place. I suggest doing ciruclar motions, with a good amount of pressure, using your fingertips all the way around your material. You’ll probably notice bits of the fibres coming through the screen. That’s normal. Make sure to lift your piece of screen up every few minutes to make sure your felting isn’t getting bound to the screen.
  10. Keep doing this for about 10 minutes on both sites, increasing the pressure and the ferociousness of your movements as you go. If you aren’t getting many suds, add more soap, and when your material starts cooling down, add more hot water.
  11. If you have bits falling outside the edges of your screen, try to work them inside your screen as you go, tigthening up the edges.
  12. You can try different agitation techniques by rolling up your screen-fibre sandwich and ringing it out light a dishtowel. Feel free to get creative with your agitation techniques.
  13. The way to test if you’ve done enough is via the “pinch” test. Remove one layer of screen, and pinch your felt. If the fibres pull up easily and on their own, you need to do more. If, however, when you pinch it, the whole pieces starts to pick up, then you know you’re almost ready.
  14. After the “felting” comes stage two of agitation – the “fulling”. This is basically just increased agitation to really get your piece tightly locked together. (It’s also my favourite stage). To do this, take your piece of felt out of the screens and rinse off the excess soap. Then, basically, start beating it up. You can throw in against the ground. You can hit it against your kitchen counters. You can scrunch it up, twist it. Anything to get super-intense agitation happening.
  15. Finally, try to find a rough surface (I’ve seen people using washing boards and corrugated shoe mats before) and rub each part of your felted piece against the rough part of the mat. See a pattern here? It’s just another way of ensuring even and strong amounts of agitation.
  16. Finally, rinse out your piece of felt, and look at what you’ve created! You have a thick, water-resistent textile.
  17. What you do next is up to you. I’m planning on adding a button and sewing up the sides to make a wee purse.Stay tuned for the next felting post – felting hats in different ways! And don’t forget to check out the Barter Babes Project!

Read Full Post »